|
General Setup
- Download the "MONARCH.EXE" file, and double
click to run.
- Choose a location to save the web template to your hard drive.
- Click UNZIP.
- Open Dreamweaver. You can get a FREE 30 day trial version at
http://www.dreamweaver.com.
- Define a Site in Dreamweaver.
To make major modification to the website, modify the main template
MONARCH.DWT in the Templates directory.
For example, if you would like to modify the Company Name or Navigation,
make sure to make the change to the template (.dwt file).
If you would like to change "page specific" elements like
the Title, Section Title (see details), or sub navigation, modify
the individual page.
- Save your modifications, and choose Update to propagate
changes to all other pages in the website that use the template.
top
Customize the Website
(Make it Yours)
 You
have made a wise decision by purchasing this Dreamweaver Website.
You already have a functional website, now all you have to do is
add the finishing touches. You
have made a wise decision by purchasing this Dreamweaver Website.
You already have a functional website, now all you have to do is
add the finishing touches.
- Organize your thoughts by creating a sitemap to determine what
pages are needed for your website. In other words just create
a heirarchy of pages so that you know how many sections and sub
section you need. (You may save this so you can use it as an true
html site map later, if you have a lot of pages)
- Add your logo or change the text to read your company name
in in the template "MONARCH.DWT" in the TEMPLATES
directory to update throughout the existing website (see
below).
- Modify the Left Navigation Bar in the template "MONARCH.DWT"
in the TEMPLATES directory to reflect the sections of your website.
Home, Service, Company, Press, FAQs, Contact, etc. by modifying
an existing button, or adding or removing buttons (see
below).
 Change the appropriate page titles and/or names, e.g. Setup Instructions
to About Us and setup.htm to about.htm.
Change the appropriate page titles and/or names, e.g. Setup Instructions
to About Us and setup.htm to about.htm.- Modify the Section Headers for your new sections, e.g. if you
have added a new section called Partners, you will need to add
the section to the left nav, create a page called partners.htm,
then modify the Section Header (see below).
- Add your copy, graphics, and code to complete your website.
top
How to Modify the Company
Name/Logo
Keep in mind, that this Dreamweaver Templates is built leveraging
Dreamweaver and Fireworks. (Download a trial version of either program:
Dreamweaver,
Fireworks)We
suggest the use of Fireworks, but Photoshop or another graphics
editing program can be used as well.
Using Fireworks
"MONARCH_HEADER.PNG"
- Open "MONARCH.DWT" in the Templates
directory.
- Select the graphic and click the Edit button in the Property
inspector.
- When Fireworks launches, make you changes by modifying the text
or adding a logo, and click Done.
- Save and Update throughout the website.
Using Photoshop, Paint Shop Pro, etc.
- Note the graphic name that you want to modify, e.g. "header_r1_c1.gif"
- Open the "MONARCH_LAYOUT.PSD" file in the Fireworks
directory.
- Make sure that you show the guides to see the "section"
of the graphic that must be edited.
- Modify the text and/or add a logo.
- Depending on the tool you are using,
export the slice
-- or --
crop the image
to save the graphic you noted in step 1.
- Save and over right the existing graphic, and the change will
automatically take place throughout the website; make sure to
publish the graphic(s) to your live website.
top
How to Modify
the Left Navigation Bar
Modify an Existing Button
Adding or Removing a Button
(this will modify the dimensions of the current file)
Modify an Exiting Button
Using Fireworks
- Select the button you want to modify.
- Click the Edit button in the Property inspector.
- When Fireworks launches, make you changes by modifying the text,
button, etc. and click Done.
- Save and Update throughout the website.
Using Photoshop or another graphics editing program
This process is is the same as modifying the
company name and/or logo if you are using Photoshop or another
graphics editing programs...and you are likely to lose some of the
rollover effects if you are not careful. We have leveraged Fireworks'
Button functionality, so it is suggested that you use Fireworks
to take advantage of the Roundtrip Graphics Editing.
Adding or Removing a Button
In this example, we will add the HOME button. In a nutshell,
you need to expand the canvas size, copy and paste a button, update
the button to read and link appropriately, and save.
 Open
"MONARCH_NAV.PNG" in Fireworks from Dreamweaver
(see the Roundtrip
Graphics Editing tutorial for details) Open
"MONARCH_NAV.PNG" in Fireworks from Dreamweaver
(see the Roundtrip
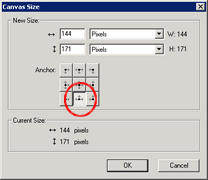
Graphics Editing tutorial for details) - Select the top button (Company), and view the Info Panel (Alt
+ Shift + F12) to find the buttons height 17. This means we need
to add 17 to our canvas height.
- Change the cavas size, Modify > Canvas Size... > In
this example we added 17 to 154 to get 171. Notice that arrow
button I selected.
- Copy an existing button, paste, the nudge the new button into
place.
- Change the text to read HOME, click Done or Save.
- Modify the link in Dreamweaver.
top
How to Create or
Modify a Section Header
- Open "MONARCH_LAYOUT.PNG" in Fireworks or
"MONARCH_LAYOUT.PSD" in Photoshop or another graphics
editing program.
- Select the Section Title TYPE layer.
- Modify the Section Title, e.g. from Your Section Title to About
Us.
- Make sure the guides and Show Slices are turned on, so you can
see the Section Header Slice.
- Export the modified the Section Header.
- Insert new graphic into the page.
top
How to Modify the Link
Rollover Effects and the Cascading Style Sheets
We have utilized Cascading Style Sheets, so in order to make changes
simply modify the existing style sheet "MONARCH.CSS"
and/or change where the style is applied
within the template (for global changes) or individual pages (for
page specfic).
Modify the Style Sheet
Personally, I like to modify the Style Sheets in Notepad because
I can access everything quickly and easily.
The style sheets looks something like the sample below, just modify
the color, font-weight, font-family, font-size or text-decoration
(underline or none) to get the style you want. Since almost everything
is already done for you, you may just want to change the colors
from #FFFFFF (white) to #CCCCCC (gray) or add another style.
For example, to add another style, you can cut and paste one of
the existing styles, then change the class name from .footer to
.yourstyle then change any of the style properties.
.footer { font-family: verdana, arial, helvetica, sans-serif; font-size:
8pt; color: #cccccc}
.footer a:active { color: #FFFFFF; text-decoration: none;}
.footer a:link { color: #FFFFFF; text-decoration: none;}
.footer a:visited { color: #FFFFFF; text-decoration: none;}
.footer a:hover { color: #FFFFFF; text-decoration: underline ;}
Change Where the Style is Applied
On the other hand, you may want to change sections of your web page
to contain different style (maybe you've created your own).
- Open "MONARCH.DWT" (for a global website change)
or a specific page.
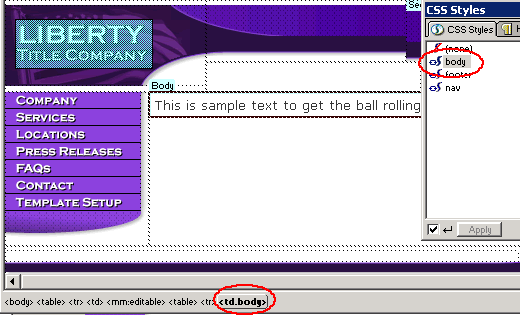
- Select the section of the page you would like to change the
style (Select a HTML tag, in this example I have selected the
td tag with the Body Editable Region).
- Click the style you would like to apply in the CSS Styles Panel
(in this example I have applied the body style).
-
Save and view your change in a browser (Netscape is a little
picky about the styles it uses so be careful).
top
|