|
Web Template Overview
Installation
Define the Site
Customize the Graphics
Modify the Navigation
Modify the Hyperlink Rollovers
(or Cascading Style Sheets)
Web Template
Overview
The Simplicity Web Template consists of 2 main pages
(Homepage and Subpage) and was built using Dreamweaver
UltraDev 4 and Fireworks 4. The homepage has a unique
layout to prime the visitor, but each succeding page
will be the subpage (pages based on the template Simplicity.dwt).
The templates consists of 3 types of navagation: Top
and Footer which are the core links, and the sidebar
navigation which might list your products or categories.
All 3 types of navigation are Library items within the
templates. This makes updating the navigation throughout
the site very easy. Each page has 2 editable regions
(Page Header and Body). This can be modifed in the template
at your discretion. The logic behind this, is that you
will only need to change these 2 areas on each page,
the navigation will stay the same. Additionally, the
template uses CSS to control the hyperlink rollovers
and body text. The details of modifying these areas
will follow in the subsequent sections below.
This template was tested in Internet
Explorer 5.5. and Netscape 6.1.
This web template consists of the following
elements:
-
Homepage (index.htm)
-
3 Templates (Simplicity.dwt,
Simplicity_Green.dwt, Simplicity_Purple.dwt located
in the TEMPLATES folder)
-
Cascading Style Sheet (Simplicity.css)
-
Editable graphics in both
PNG and PSD formats.
-
3 Library items (top_nav,
category_sidebar, and footer_nav) which govern the
site's navigation.
-
Setup and customization
instructions (this file setup.htm)
top
Installation
-
After purchase you will be redirected
to a download page, download the file: Simplicity.exe.
-
Double-click Simplicity.exe to install
the files to your hard drive.
-
Click UNZIP to save the files.
top
Define the Site
-
Open Dreamweaver and hit F8 to launch
the Site window.
-
Launch the Site Definition window
from the menu bar
Site > New Site Select Local Info on the left,
name your Site and point to the directory where
your files are located.
-
Lastly, select Remote Info in the
left column and add the appropriate information.
This will vary depending on your web host.
top
Customize the
Graphics
Graphics can be easily customized, you can
edit these graphics with any tool (Fireworks, Photoshop,
Paint Shop Pro, etc.), but this template was built utilizing
the tight integration of the Dreamweaver 4 Fireworks 4
Suite. If you do not have Fireworks 4, you can download
a 30 day evaluation copy for FREE at Macromedia.
If you are using Fireworks, use the Roundtrip
Graphics Editing.
If you are using Photoshop or another graphics
editing tool follow these steps.
- Locate the file you want to change, for example
top_navigation.gif. and look for the corresponding
PSD file in the Fireworks folder.
- Open the top_navigation.psd in Photoshop.
- Make the necessary change, i.e. Company Name.
- Save the file in the appropriate format (gif or
jpg) replacing the file top_naviagation.gif.
- The change will be made thoughout the website.
top
Modify the Navigation
Because the Simplicity Web Template uses
Library items, there are 3 navigation files top_nav, footer_nav,
and category_sidebar. Note: top_nav contains a graphic,
so you may have to customize this
before you change the navigation.
- Open the Library Panel, Window>Library.
- Double-click the navigation item you would like
to edit, this will open a new widow.
- Make modifications and save. You will be ask to
Update Library items, choose Update.
- Make sure to save any open pages in Dreameaver,
to update Library items.
top
Modify the Hyperlink
Rollovers (or Cascading Style Sheets)
Personally, I like to modify the Style
Sheets in Notepad because I can access everything quickly
and easily.
Open the file from NotePad.
The style sheets looks something like the
sample below, just modify the color, font-weight, font-family,
font-size or text-decoration (underline or none) to get
the style you want. Since almost everything is already
done for you, you may just want to change the colors from
#FFFFFF (white) to #CCCCCC (gray) or add another style.
For example, to add another style, you can
cut and paste one of the existing styles, then change
the class name from .footer to .yourstyle then change
any of the style properties.
.footer { font-family: verdana, arial, helvetica,
sans-serif; font-size: 8pt; color: #cccccc}
.footer a:active { color: #FFFFFF; text-decoration: none;}
.footer a:link { color: #FFFFFF; text-decoration: none;}
.footer a:visited { color: #FFFFFF; text-decoration: none;}
.footer a:hover { color: #FFFFFF; text-decoration: underline
;}
Change Where the Style is Applied
On the other hand, you may want to change sections of
your web page to contain different style (maybe you've
created your own).
- Open "SIMPLICITY.DWT" (for a global
website change) or a specific page.
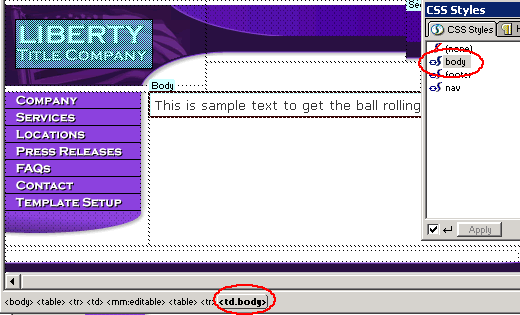
- Select the section of the page you would like
to change the style (Select a HTML tag, in this
example I have selected the td tag with the Body
Editable Region).
- Click the style you would like to apply in the
CSS Styles Panel (in this example I have applied
the body style).
- Save and view your change in a browser (Netscape
is a little picky about the styles it uses so be
careful).

|

